

Raising Children
Easy Paper Snail Craft for Kids: A Fun Rainy Day Activity
Learn how to make cute paper snails with your kids using colored paper, cardboard, and glue. This simple craft is perfect for a rainy afternoon.
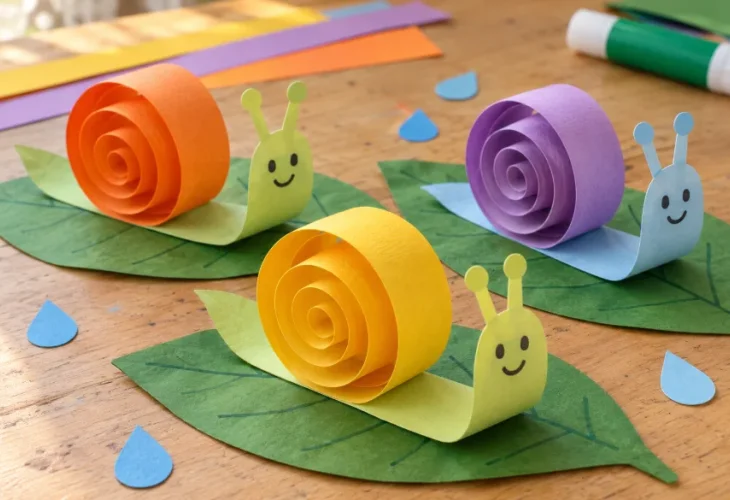
After a rainy day, a short walk outside often reveals some fascinating little visitors: snails slowly making their way along the sidewalk, through the grass, or across fallen leaves.
Why not turn that discovery into a fun afternoon craft?
With just a few basic supplies, you and your children can make adorable, colorful paper snails with spiral shells, cheerful faces, and leafy homes.
This easy craft takes about 30 minutes and is suitable for a range of ages. Younger children can enjoy coloring, decorating, and gluing pieces prepared by an adult, while older kids can practice their cutting, rolling, and assembling skills.
Best of all, there's plenty of room for creativity, so every snail can have its own unique personality!
What You'll Need
Colored construction paper
Thin cardboard for the snail's body
Sturdy cardboard for the leaves
Child-safe scissors
Glue stick
White craft glue
Pencil
Ruler
Colored markers
Step 1: Make the Spiral Shell
Start by cutting a strip of colored paper approximately ¾ inch (2 cm) wide and 12 inches (30 cm) long.
Wrap one end of the strip around a pencil to create the beginning of a spiral. Carefully remove the pencil and continue rolling the paper by hand.
For a tightly curled shell, keep the paper rolled snugly. If you prefer a larger, more open spiral, loosen your grip slightly as you roll.
Once you're happy with the shape, secure the outer end with a little glue and hold it in place until it sticks.
Want to make an extra-large shell? Join two strips of paper together before rolling.
You can also combine different colors to create a fun, multicolored spiral. Try using contrasting shades for an especially eye-catching effect.
Step 2: Create the Snail's Body
Cut a strip of thin cardboard approximately 1¼ inches (3 cm) wide and 5 inches (12 cm) long.
Leave about 3 inches (8 cm) flat to form the snail's base and tail, then fold the remaining section upward to create its head.
Round the top corners of the head with scissors, and use markers to draw two eyes and a smiling mouth.
For the tentacles, cut two short, narrow strips of cardboard and glue them behind the head.
There's no need for googly eyes, beads, or other small decorations. Simple paper and markers are all you need to give your snail a friendly face.
Next, position the spiral shell upright on the flat section of the body, with the swirl facing outward.
Apply a small amount of white craft glue along the bottom edge of the shell and gently press it into place. Hold it for a moment, then leave it to dry.
If the shell feels unstable, attach a couple of small folded cardboard pieces on either side to provide extra support.
Step 3: Make a Colorful Leaf
Every little snail needs somewhere to rest!
Draw a large leaf shape on a piece of sturdy cardboard and carefully cut it out.
Use a green, yellow, or brown marker to add veins and other details. Children can also decorate their leaves with patterns, dots, or different shades of color.
For an extra rainy-day touch, cut small raindrop shapes from blue paper and glue them onto the leaf.
Once the snail's shell has dried completely, place it on top of its new leafy home.
You don't have to glue the snail to the leaf. Leaving it unattached allows children to move their creations around, swap leaves, or create their own little snail adventures.
Step 4: Experiment With Different Sizes and Colors
Before putting away the craft supplies, why not make another snail?
This time, try using a shorter strip of paper for the shell, or roll it more tightly than the first one.
Place the two snails side by side and ask your children what they notice.
How does the length of the paper affect the size of the shell? What happens when you roll the paper more loosely? Which colors look best together?
It's a simple opportunity to introduce children to shapes, sizes, and basic comparisons while encouraging creativity and fine motor skills.
You can even turn the finished snails into a little game. Give each one a name, arrange the leaves into a winding path, and let the children move their snails from one leaf to another.
With a little paper, cardboard, and imagination, a simple rainy-day walk can become a delightful hands-on activity that keeps children entertained long after the rain has stopped.

